The task slide-in is a useful feature to use particularly when editing tasks, whilst you have the context of the planner in sight. The task slide-in can be accessed on the Event and Runbook planner and will provide the same functionality from both. Whenever any updates are made on the slide-in, these will be automatically saved.
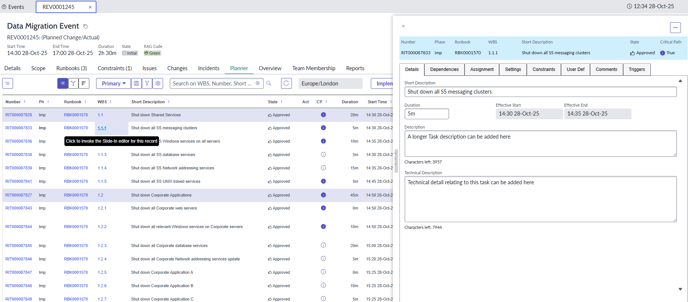
- To invoke the task slide-in, click on the relevant task WBS as shown above. Should you want to change the task in context, simply click on another task WBS and the slide-in will change to reflect that.
- The task slide-in will display the following information on the top banner:
- the task id number
- the phase the task is in
- the Runbook the task is in
- the task WBS (Work Breakdown Structure)
- the task Short Description
- the task state
- is the task on the Event critical path, true or false.
- Also available , if you have the permissions, is the Approve, Activate or Complete buttons when relevant.
- The more options drop down on the right hand side will also display the links for the following:
- Suspend Task, if the task is active and you have the permissions to suspend a task
- Show In Tab, which allows you to navigate to the task record page
- Close Slide-in
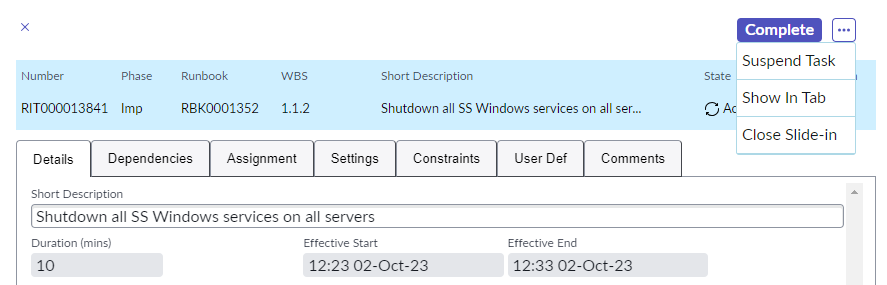
- Again, depending on your permissions, you may see the following tabs within the slide-in, which we'll describe in detail individually:
- Details
- Dependencies
- Assignment
- Settings
- Constraints
- Use Def
- Comments
- Triggers
- The Details tab will display:
- the task short description
- any more detailed description of the task
- technical description which could be used to outline the technical steps or information on scripts to be run
- the task duration in context (ie planned, forecast or actual, depending on the task state)
- the effective start time in context (ie planned, forecast or actual, depending on the task state)
- the effective end time in context (ie planned, forecast or actual, depending on the task state)
- The Dependencies tab will display the existing dependencies, predecessors and successors, and allow you to edit the dependencies if you have the permissions. To see more about dependencies, see the following article:
Create Dependencies - The Assignment tab allows you to see or edit who a task is assigned to, if that is required. In order to assign a task to a task owner, a team or a group, they must have been added to the Event or the Runbook to be available for selection. The following articles explain how to add membership to a Runbook or an Event:
Event Membership
Runbook Membership
You must also have the correct permissions to assign a task. - The Settings tab allows you to edit and see any special settings which are attributed to the task. Just click in the boxes to apply. The following features can be applied from here:
- Task Controls:
- Auto activate: a task can be set to auto activate when it's predecessor tasks have completed and/or any constraint time on the task has been reached
- Auto Complete: a task can be set to auto complete when it's planned duration has elapsed
- Skip Task: a task can be set to skip and will auto activate and auto complete immediately, with a zero duration, regardless of any planned duration on the task. This might be used during a rehearsal or walkthrough of parts of a runbook or event. If the task is then un-skipped, after a clone of the event for example, the task duration will revert back to the planned duration
- Milestones: certain tasks may need to be flagged as milestone tasks, as tasks with some importance. This allows you to monitor these tasks using some of the shipped reports available from the Runbook or Event planner. Once a task is flagged as a Milestone, you can align a level of 1, 2 or 3. These levels can be determined by your team or your organisation. Hovering over a milestone flag will reveal the relevant level. All Milestone Tasks will be set at zero duration and will auto activate and auto complete.
- Comms: for some tasks, comms may be required for the following reasons:
- Task Controls:
-
-
- to alert task owners that their tasks have become available
- to alert the runbook or event managers that certain tasks have been activated or completed
- to alert the runbook or event managers that tasks are late
-
- The Constraints tab allows you to add a time constraint to a task, where that task cannot be activated before that time, regardless if predecessor tasks have been completed.
- To add a time constraint, firstly add a title
- Then select your Start No Earlier Than time from the date picker
- You can then choose to make the time constraint active or not by selecting True or False. At this stage, you may want to add as a placeholder by marking as False and you can then go back at a later date and change to True, will will activate the constraint
- Then select Add and your constraint will be added to the task
- The User Defs tab can be used to add data into one of six User Defined Fields. You would use this to capture some data where there isn't a specific field in RBM. Once data is added into any of these fields, the columns can be added to your view in the planners for visibility or for filtering.
- The Comments tab can be used to create a narrative or gather notes around this particular task. Just write your comments in the box and select Post Comments and they will be automatically saved under Activity. It's worth noting that once the comments have been added, they cannot be deleted.
- The Triggers tab can be used to define which tasks may be bringing a Service down and back up, as defined in the Scop tab of the Event or Runbook.